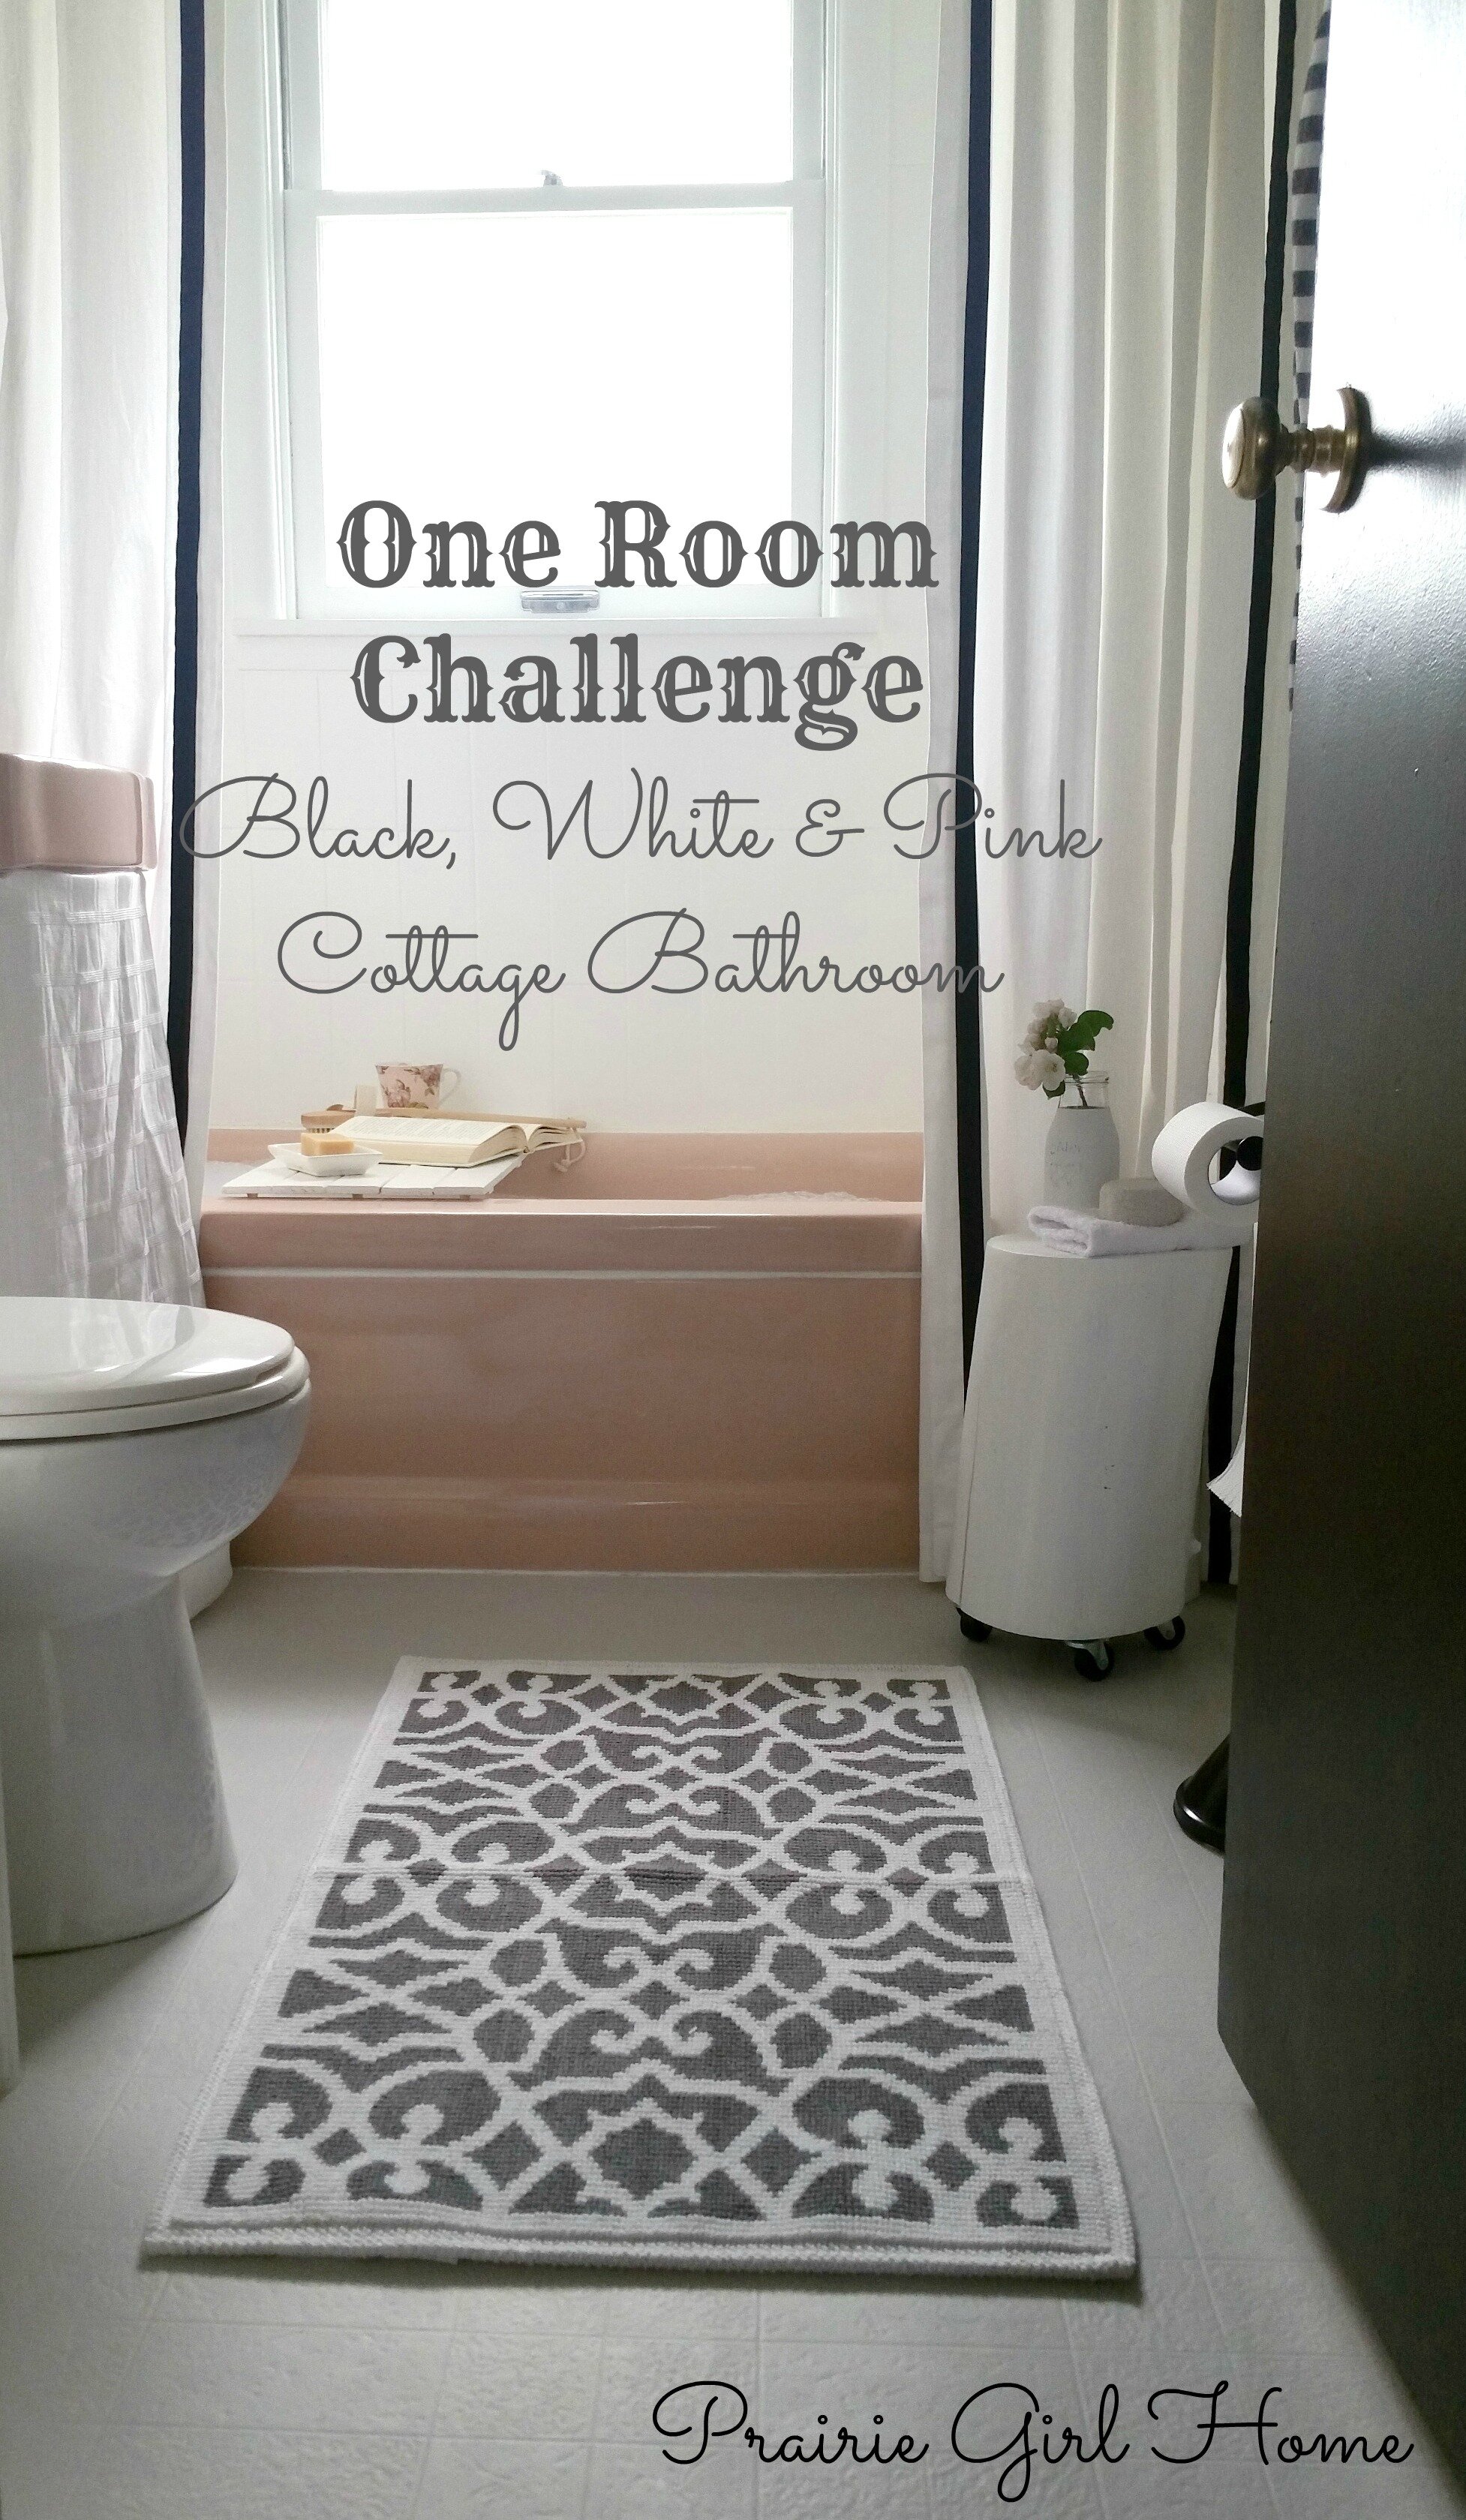
We made it. I almost can’t believe it, but we survived. Making over one room in six weeks was chaotic at times, to say the least, but so worth it. I am so excited to share with you today our newly completed cottage glam bathroom makeover!

Just to refresh your memory, or if this is your first visit to Prairie Girl Home, here is what we started with.

My challenge was to update this space, without doing a full demo and renovation. That meant we were keeping the original 1955 pink bathtub and sink! I’ll be completely honest, I wasn’t even sure until a couple of days ago that I was going to be happy with the results. You see, at first I thought this tub and sink were a cute shade of blush pink. Nope. They are dusty rose. Blush pink is like an adorable, trendy and fun twenty-something girl, while dusty rose is the shy and slightly uncool sister. I kept going though, hoping that with all of the black, white and grey shades going into this bathroom, the dusty rose would somehow grow into the mature, subtle and elegant lady that she is. I was right. The ugly duckling grew up into a beautiful swan.

I’m in love, you guys. Love. I can’t tell you how proud I am of this little space. That sounds like I’m tooting my own horn, but hey, I’ve think I’ve earned a little tooting rights. Wait… that didn’t sound right. Let’s blame it on the fatigue. Over the last week, we poured our blood, sweat and tears into this little bathroom makeover. More work happened in the last week, than the other five combined! I told you, I’m a horrible procrastinator, but that also means I’ve learned to work well under pressure.
Today, I will try to talk less so we can focus on all the pretty pictures! I will come back next week with a complete source list and budget breakdown. I love when people share their budgets, so I’m opening up and sharing! There were also a lot of DIY projects in this little room, so I will be back to share a few tutorials for those as well.

I’m still amazed at how our medicine cabinet transformation turned out. The power of trim and paint, so simple, yet so powerful!

I had planned on sewing an adorable sink skirt, with either neat and tidy pleats or ruffles or gathers, but time got the best of me. Instead, I used our old shower curtain and some dollar store velcro adhesive to hobble together this sink skirt. For 15 minutes of work and maybe 2 dollars in materials, it’s a huge improvement over the before!

I just love our new little faucet. The only items in the bathroom that were actually updated were the faucet, the light fixture and the toilet. I’m so glad we made those choices, because I think all three things go a long way to updating the space.

The new white toilet is awesome! Who knew I could be so excited about a toilet? We looked for a used white toilet in decent condition, but our search came up short. So we bought the least expensive one we could find and I’m so glad we decided to take the plunge. (Oh my. I didn’t even plan that one. Help me. I need sleep!) Okay, moving on. The white is so clean and fresh, the old beige one would have been such an eye sore next to all our new pretty white trim. I also love that it’s just a regular height, round bowl toilet. Life is about the little things and a white, regular toilet makes this girl happy!

The light fixture I had planned for the space ended up not fitting in the space. I had a backup option in mind at Lowe’s, but they were out of stock. The lovely gentleman in charge of the lighting department though, was kind enough to sell me the display model! It was brown, so I gave it quick coat of black spray paint. (Don’t look too closely at my spray job, drips are what happen when you rush spray painting!) We actually had to hang it upside down, or we would not have been able to access the bulb. The look has really grown on me! I love the wire cage. The matte black looks so good against our new grey and white birch tree wallpaper.
Oh, the wallpaper. I have this thing for wallpaper. I love it. However, my poor mom, who so lovingly offered to install it for me and who is an extremely talented DIY woman herself and has applied wallpaper probably dozens of times, had a horrible time with this paper. Unfortunately, it was paper thin and ripped very easily. She persevered though and got the job done. It looks amazing! I think it’s the real showstopper in this little bathroom.

This might be one of my favourite views. I have a lot of favourites, but those turkish linen towels (which are amazing, by the way), against the bright white wainscoting, with the thick trim and our new sleek black hooks, set against that gorgeous wallpaper with those sharp black frames and DIY art – love, I tell you. Love.
Speaking of DIY art. I had a few ideas for this spot, but I never know what will work until I see it all come together at the end. So one of my last minute DIY projects were putting together this cute little trio. The frames are from the dollar store. The pages are from my “Secret Paris” adult colouring book. I just realized how that may have sounded. Adult, as in, us old people can colour too and not adult, as in, hide from your children’s eyes. (Although, come to think of it, I do hide my book from my kiddo, as well as my good pencil crayons, because a mama has to have some things just for herself!) I just used pink and grey pencil crayons to give the prints just a touch of colour. I love how they turned out!

Another last minute DIY art project, was this cute little chalkboard frame I whipped up.

I decided it might be a good idea for me to label the doors in our house. I plan on making matching ones for our bedrooms and our office. You know, just in case we get lost in our 960 square foot mansion.

Oh, and that cute little toilet paper stand? Eight dollars. I found it used online. It was oil rubbed bronze, but that’s nothing a little spray paint couldn’t fix.


This little tray was another last minute addition. I had planned on making one, but I ran out of time. Then I was in the unfinished wood aisle at Michael’s, and saw this little wood sign. A little white paint and it made the perfect little bathtub tray. I have always wanted one of those! Honestly, one of favourite ways to unwind is with a hot bubble bath, a good book and a cup of tea. So in addition to looking pretty, this will actually get a lot of use!

I searched for a few accessories in dusty rose, to tie in the tub and sink. Do you know how many accessories there are in dusty rose? Not many. I’ll tell you that. Blush pink, like I said, is the trendier, cool sister. But check out that adorable little dusty rose teacup! Gorgeous. So there you go, dusty rose for the win.

We have to talk about the stump side table. I’m so happy I made time for this little DIY project. My plans for it changed a few times. After a complete disaster with some grey stain, that they should really just call, “extremely ugly shade of grey paint”, I just decided to go back to plan A and paint it white. I couldn’t be happier with how it turned out. That little split in wood at the side? Perfection.

I’m also a little obsessed with that adorable little milk jug vase. Again, the vase is a Michael’s find that I transformed with a little chalk paint. That adorable little apple blossom I cut from the tiny apple tree we planted last fall in our backyard. Yes, I love it so much, I kept on moving that cute little vase into almost every shot. Can you blame me?

The little shelf above the door was another project we finished up at the eleventh hour. I’m so glad we did. In a small bathroom, this is a great way to squeeze in a little extra storage. Storage, OR more display space for cute accessories! Either way, it’s great.

Okay, now that I look at this, I want to move that little antler hook down about an inch and a half. Although, it is very sharp. It wouldn’t be a good thing if it ended up poking my tall hubby in the eye. All right, it can stay where it is.
All of the black and white just makes my heart go pitter patter. I have this thing for black and white. It gets me. Every, single, time.

Remember the $5 used chandelier I shared with you on week two? Not bad for five bucks, eh? Spray paint can work miracles, my friends, miracles. Those are battery operated candles, by the way. So no need to worry about electrical and water mixing, or flames falling on our head whilst we bathe. That would be sad. Safety first.
A few more details.


My husband says one of his favourite things about the makeover is that we hung the curtain rod at the ceiling. I agree, it does make the room feel taller. I also think that using a pair of curtains, instead of just one, frames the tub so nicely.

I don’t think I can pick a favourite thing. Seriously, I’m in love with all of it!
I think what I learned with this renovation, is that if you have something you consider to be an eyesore, like a pink bathtub, but have very little money to change it, that doesn’t mean the room still can’t be beautiful. I knew we could make it better, but really, I had no idea that I would love the transformation this much!

Let’s remind ourselves how far we came with a few before and after shots, because who doesn’t love a good before and after?

I am so happy we painted that old tile! It was a big job, but wow. That bright white tile looks almost new.


Yes, I painted the old linoleum floor! I’ll be back to share a few details on that DIY. If you recall, I did end up ordering some new vinyl, but sadly, it did not arrive in time. I have to say though, if I had not have already ordered it, I may have ended up just keeping this painted floor. Huge improvement, right?
It’s hard to believe we lived with the ugly before for nearly two years! Although, considering the amount of work that went into this makeover, I can believe it. Hours and hours went into this tiny little room. Was it worth it? Most definitely!!!
Now after all of that hard work, I think I’ve earned myself a nice hot bubble bath!

If you would like to get fully caught up on this transformation, here are the previous One Room Challenge posts.
Week One – Our Cottage Bathroom Makeover
Week Two – Our Cottage Bathroom Design
Week Three – Cottage Bathroom Progress
Week Four – Trim, Paint And Other Progress
I will update this post with links to any future posts related to this makeover. Stay tuned for the full source list and budget breakdown coming next week!
I want to say a huge thank you to my sweet husband and my loving mom who helped out with this little makeover. I couldn’t have done it without them!
Another huge thanks to Linda, of Calling It Home, for creating and hosting the One Room Challenge! I’m so glad I took the leap and jumped into blogging, starting with this challenge. So far, blogging has been a huge creative outlet for me and I am loving it! If you haven’t had a chance to check out the makeover reveals that the featured designers shared yesterday, you can do so here. All of the other guest participants, like myself, shared their makeover reveals today! Check them out here. You should be able to find loads upon loads of eye candy and inspiration!
Thank you so much for following along! I appreciate it! Feel free to leave a comment below, or catch up with me on Instagram.
UPDATE: Click here to see the source list and the budget breakdown for this makeover!
UPDATE: Here is how the bathroom looks now, with our new vinyl flooring installed!

Can you believe it’s vinyl? It really added the final finishing touch!

Linking with:
Thrifty Decor Chick – Before & After Party
 Currently we are participating in Calling It Home’s 6 week, One Room Challenge and we are giving our outdated 1955 bathroom a cottage glam makeover. If you missed the updates from the previous weeks, you can find them here:
![IMG_5952[1]](http://i1.wp.com/prairiegirlhome.com/wp-content/uploads/2016/05/IMG_59521.jpg?resize=768%2C1024)


![IMG_5944[1]](http://i0.wp.com/prairiegirlhome.com/wp-content/uploads/2016/05/IMG_59441.jpg?resize=768%2C1024)
![IMG_5947[1]](http://i1.wp.com/prairiegirlhome.com/wp-content/uploads/2016/05/IMG_59471.jpg?resize=768%2C1024)

