Our Cottage Glam Bathroom – Source List and Budget Breakdown

pinterest bathroom collage

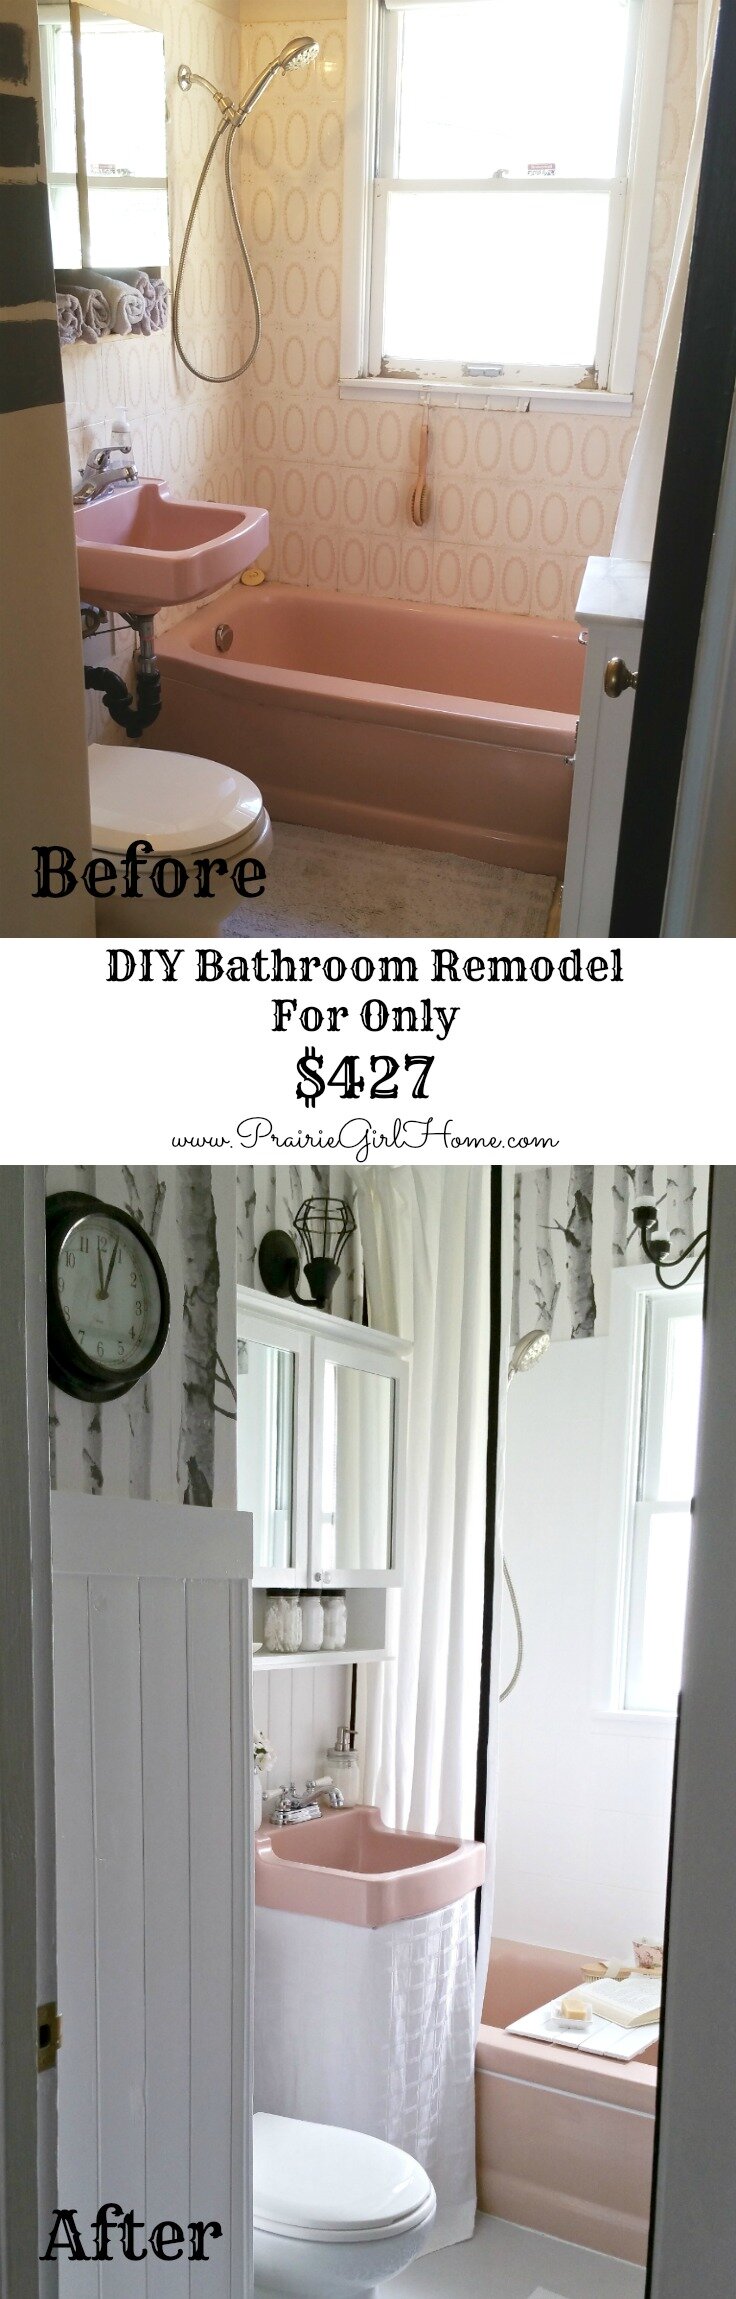
Hello! Today I wanted to share a detailed source list and budget breakdown of our completed Cottage Glam bathroom. It has been just over two months since we finished up this makeover and we are still so in love with how it turned out! It was a lot of work, but so worth it. The One Room Challenge was just the push I needed to tackle this little room. If you missed the reveal, you probably want to check out that post right here.

TitlePic

The goal with this makeover, was to update the space and give it a fresh look, without doing a full renovation. We hoped to improve the space dramatically, without spending a lot of money. I feel like we definitely met our goal!

Call me nosy, but when I read about someone’s renovation or makeover, I am always curious what their actual cost was. This is especially the case if they are doing the project on a tight budget! Hopefully you find this post helpful in planning your own bathroom makeover. Here is a breakdown for you of how much a small renovation like this might cost you. If no price is listed, this is because I already owned the item. I have included links to the actual items I purchased for this makeover, as well as some similar items. All prices are in Canadian dollars, unless otherwise noted.

Also, even though I named the sources and included links for most of the accessories, I did not include these in the final cost of the renovation. I only included fixed items that would remain with the house if we ever were to sell it. If I missed any sources you are curious about, just ask in the comments!

20160512_120033

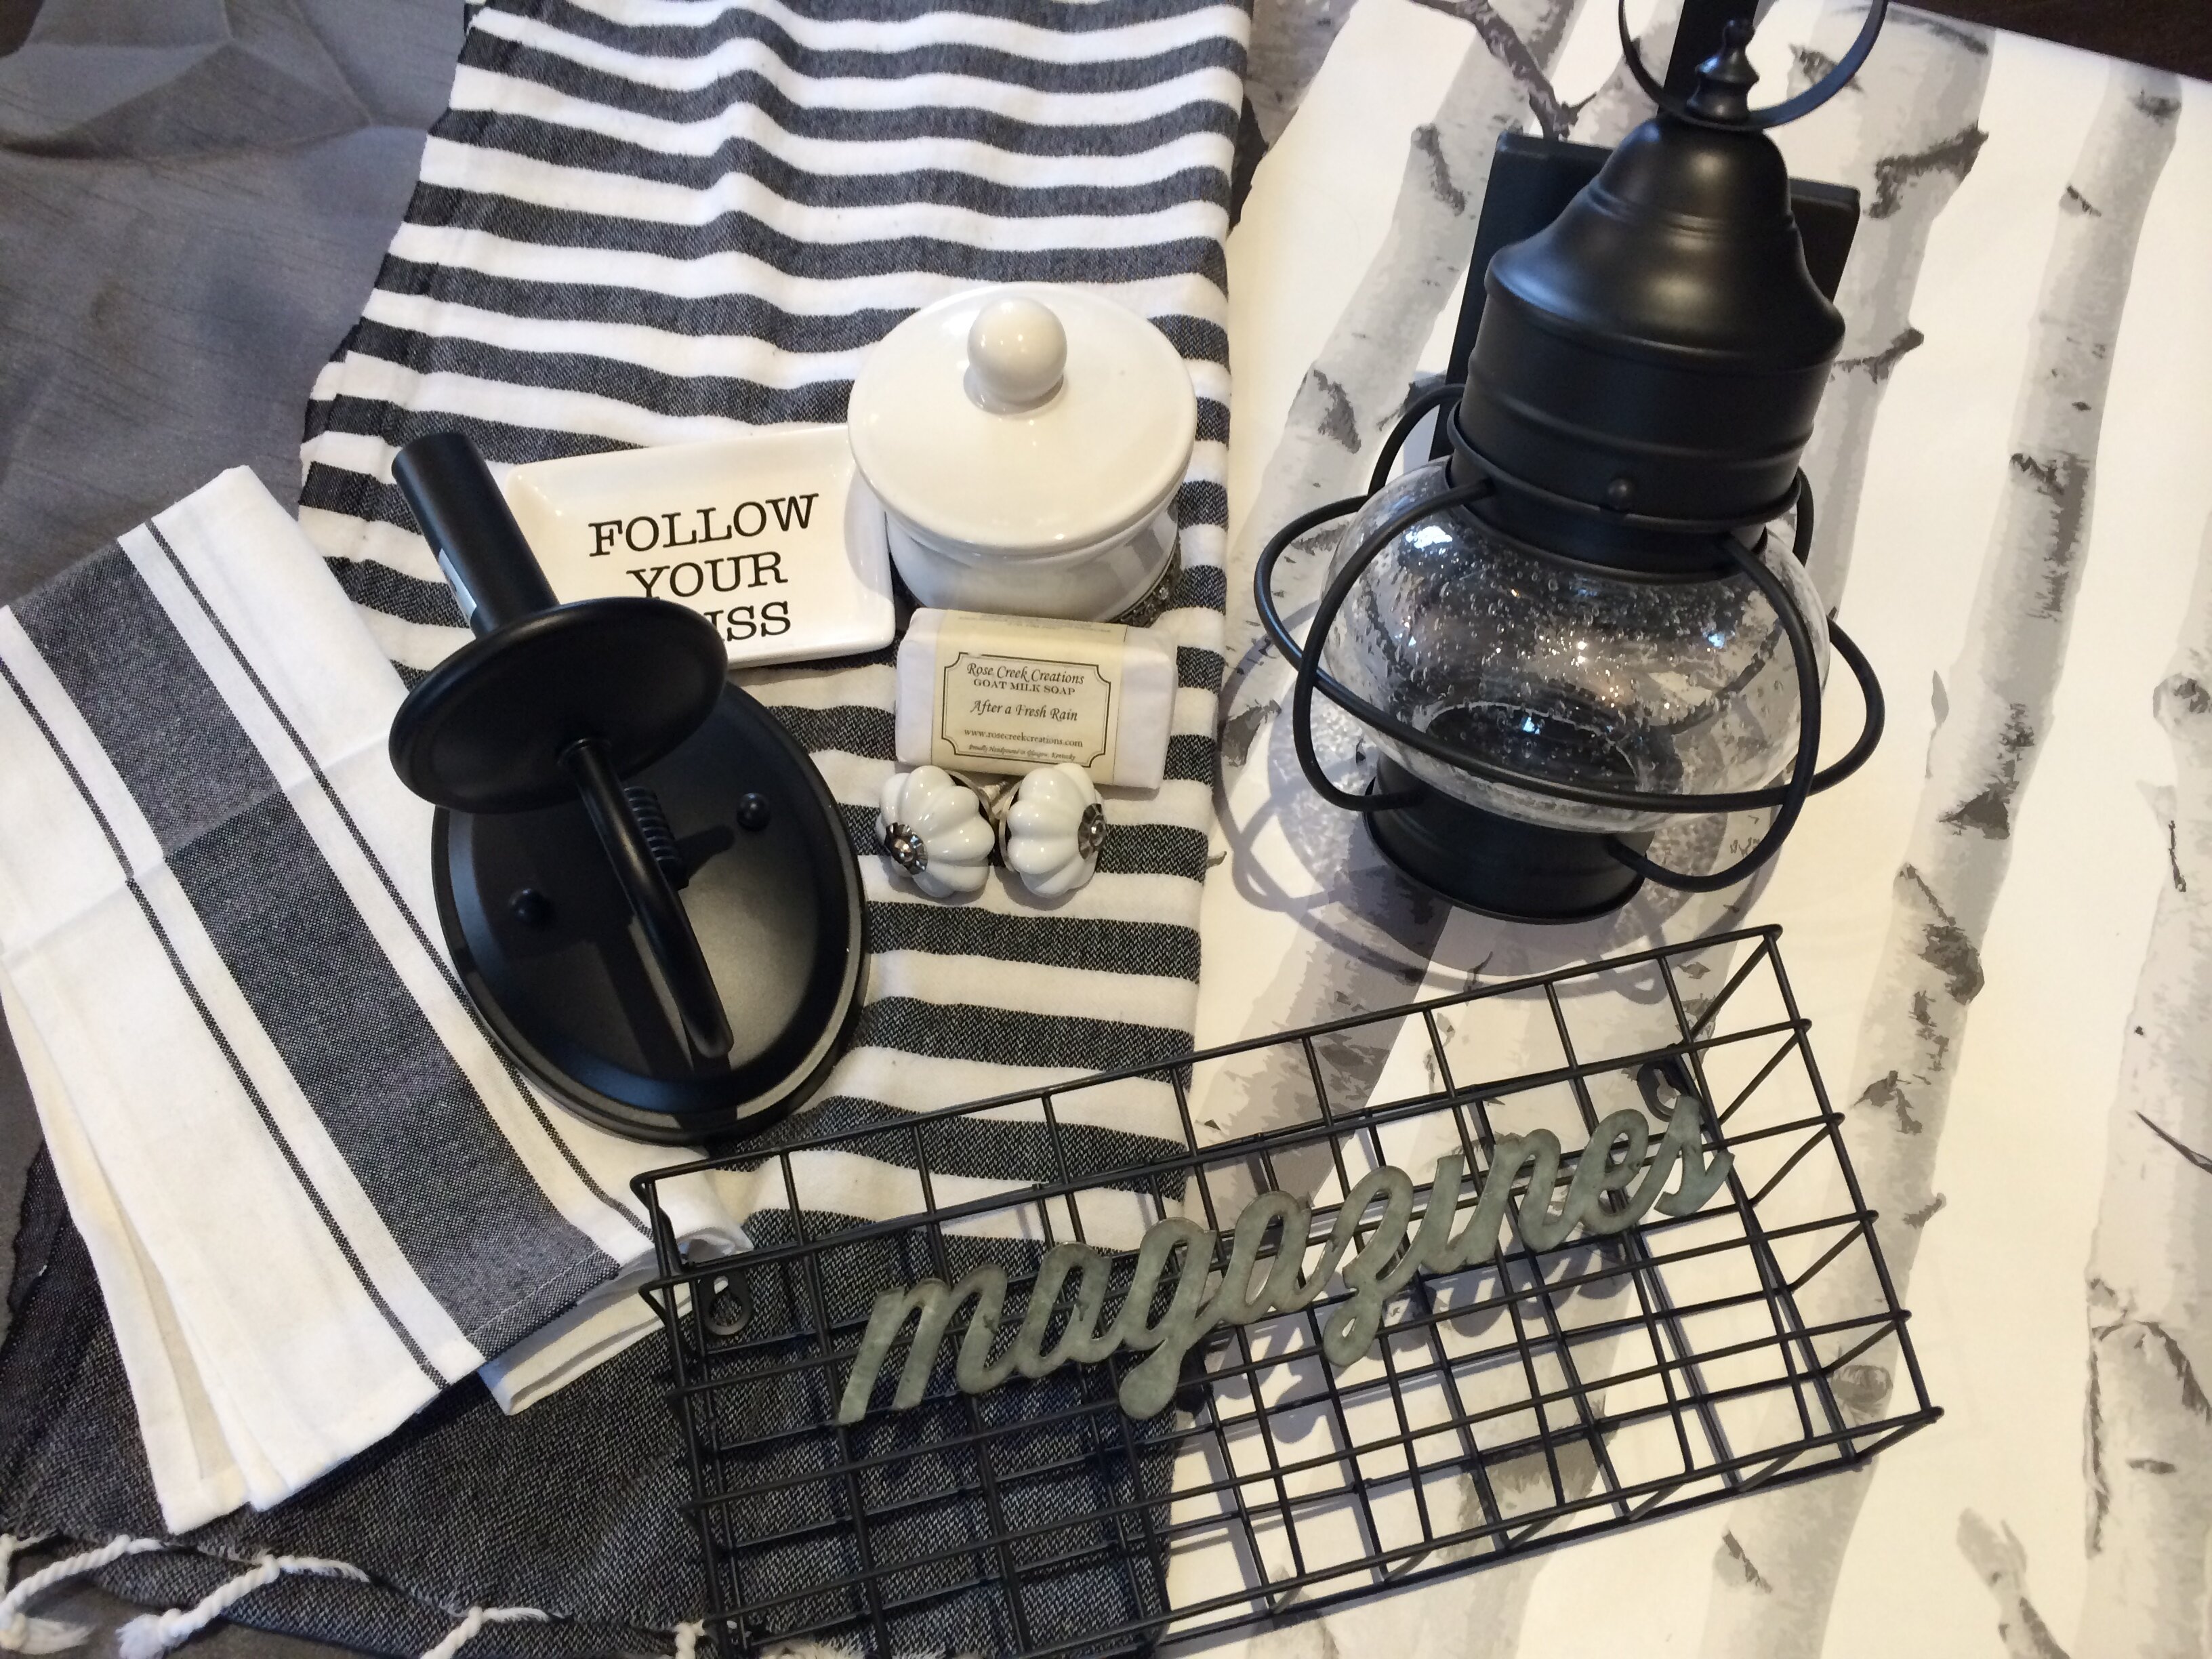
  • Wire Sconce – Lowe’s – $64.99 (spray painted in Rustoleum’s flat black) | similar (great price) | industrial farmhouse option I love
  • Glacier Bay Toilet – Home Depot – $110.00
  • Black Wire Hanging Basket – Michael’s – $10.49 (with coupon, never go to Michael’s without using a coupon!) | similar | similar

20160511_180244

  • Danze Faucet – Canadian Tire – $38.99 (Sale Price) | Amazon
  • Glass Milk Jug – Michael’s – $3.29 – DIY Chalk Painted
  • Mason Jar Soap Dispenser – Bed, Bath & Beyond – $10.99 | similar
  • Black and White Towel – already owned, Walmart (no link) | similar | turkish linen option | cute option

20160511_181206

  • Acrylic “Glass” and Chrome Knobs – already owned, found on local used site | same
  • “Rose Petal & Vanilla” Bar Soap – Marshall’s – $4.99 | cute option | gift set of 4, beautiful packaging
  • White 4×6 Frame – IKEA Ribba (already owned) – DIY scrapbook paper quote
  • Small White Frame – Michael’s – $1.50 – DIY Chalkboard M using black card stock and chalk
  • Ceramic Tray/Soap Dish – Michael’s – $1.50
  • Cream Bar Soap – Dollarama – $1
  • Mason Jars – (owned, spray painted lids in Rustoleum’s flat black)

20160511_181913

  • Birch Tree Wallpaper – Bouclair Home – $39.99 x 3 = $119.97 (I LOVE this wallpaper, but just FYI it was very thin and ripped easily, which made it difficult to apply. We ended up using way more wallpaper than we should have needed to, increasing our cost, simply because so many pieces ripped during installation and we had to throw away those pieces.) | similar
  • Towel Hooks – Home Depot – $ 5.98 x 4 = $23.92 – chrome (black not online) | similar
  • Black and White Turkish Linens – (I already owned these. I LOVE these towels, they dry so quick, are super absorbent, gorgeous and a great price considering they are the real deal, straight from Turkey! When ordering, just say you want the same towels as Kari from Prairie Girl Home) – Burlap, Linen & Lace | similar | similar
  • Black Frames – Dollarama – $3 x 3 = $9 | similar
  • Artwork – Secret Paris Color Your Way to Calm (I chose light pink and charcoal grey pencil crayons) – $11.02 (already owned)

20160511_181614

  • White MDF Shelf – Rubbermaid – $15.38 (We could have saved money here and used a piece of wood from our stash, but we ran out of time to get it cut and painted, so I took the easy route and bought a pre-cut, painted shelf)
  • Brackets – Rubbermaid – $9.88 x 2 = $19.76
  • Large White Bath Towels – gift, already owned | similar
  • White Basket – (from Home Outfitter’s, ten years ago) | similar
  • Terracotta Planter – Dollarama – already owned, painted white
  • Faux Plant – IKEA – already owned
  • White Antler Hook – Bouclair Home – $19.99 | another option | cute single hook

20160511_180746

  • White Cotton Curtains 96″ length – JYSK – ribbon trim DIY – already owned | similar | another affordable option
  • Fabric Shower Curtain Liner, Extra Long – Bed, Bath & Beyond – $31.99 (with coupon) | similar (affordable)
  • Bath Rug – Bed, Bath & Beyond (sale price – $14.99) | similar
  • Tree Stump Side Table – DIY (materials cost around $10)
  • Toilet Paper Stand – found on local used site, spray painted black – $8 | similar

20160511_175005

  • Bathtub Tray  – Michael’s unfinished wood plank plaque – $13.19 (with coupon) – I found this in the aisle with the other unfinished wood projects, removed the twine attached for hanging, painted it with some leftover gloss white paint and added some rubber feet so it would sit snug on my bathtub. Easy peasy! This would be easy to DIY if you have some leftover wood and then just paint or stain and poly, whichever you prefer. Again, I was running short of time at the end of the One Room Challenge and it was easier to just buy the piece ready made, all I had to do was paint.
  • Teacup – Homesense – $4.99 | pretty option | modern option
  • Scrub-brush – Dollarama – $3 | similar
  • Ceramic Tray – Michael’s – $1.50

Chandelier Before and After

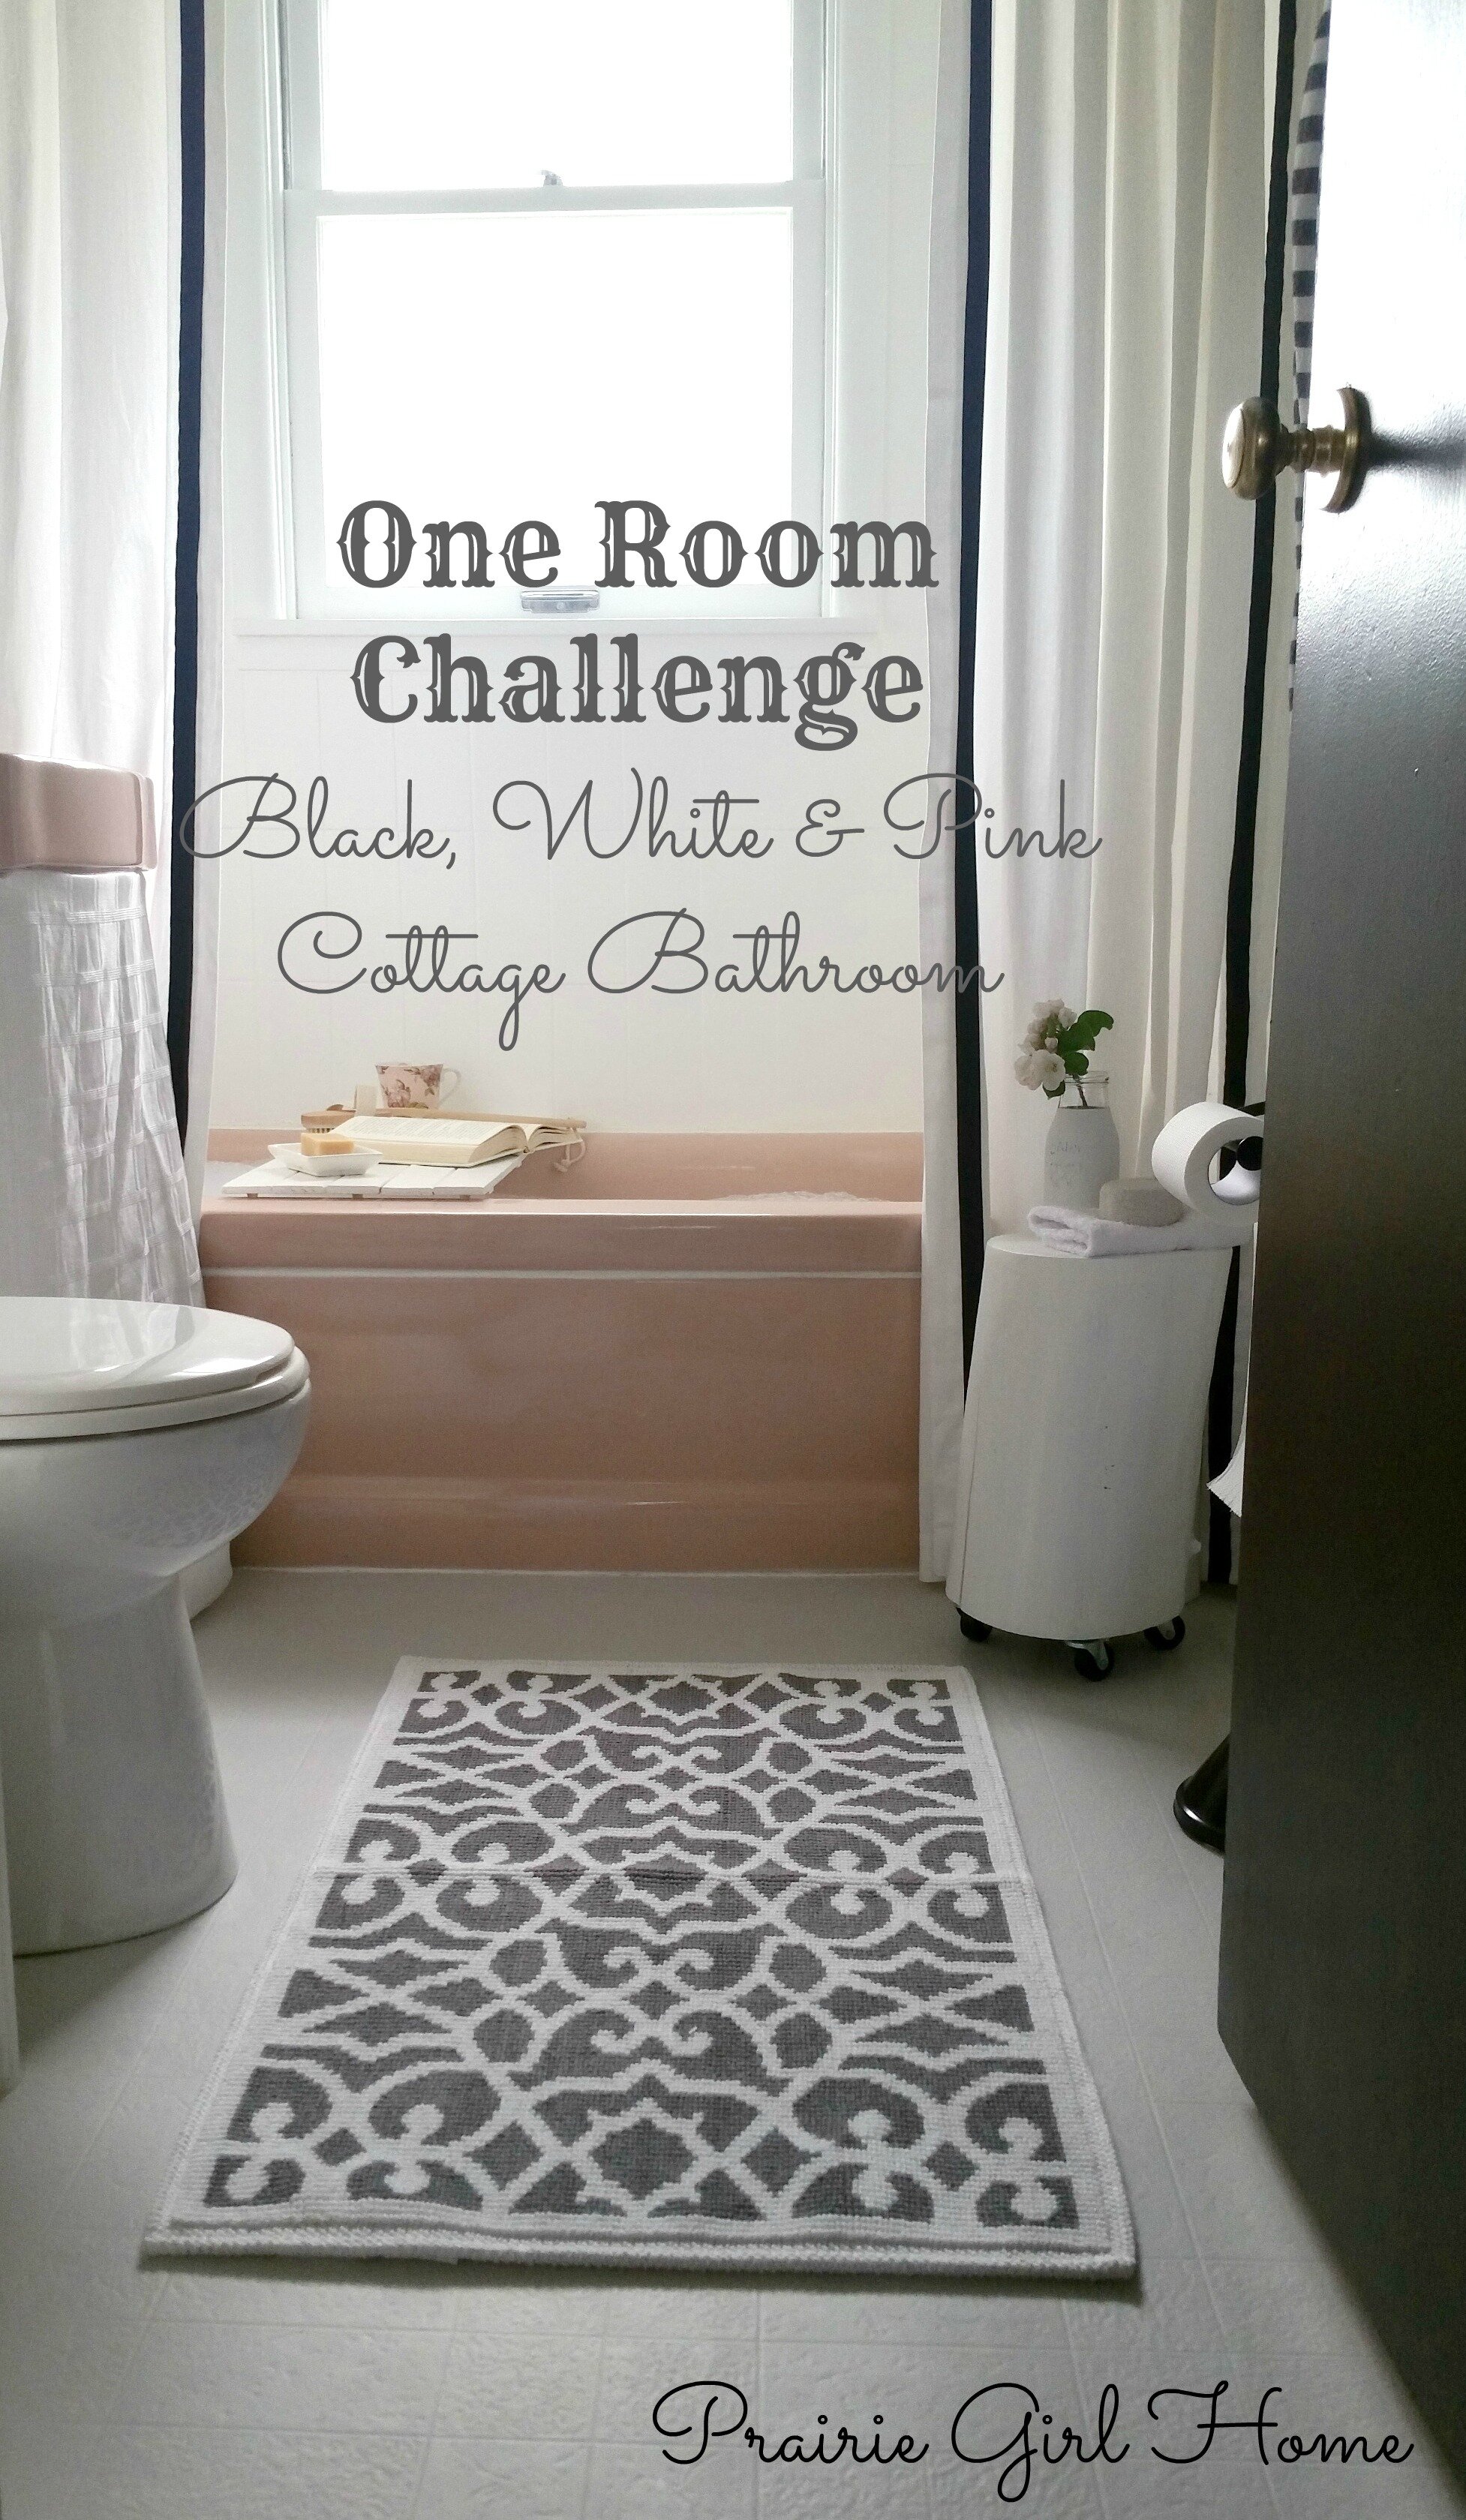
Remember the steal-of-a-deal $5 chandelier I found on a local used site? One of the best lessons you can ever learn when it comes to home DIY is never underestimate the power of paint! It is the cheapest, easiest and often the most dramatic way to update ANYTHING. Walls, floors, furniture, accessories, light fixtures – nothing is off limits when it comes to paint! For this little chandelier, we removed the wiring and sockets, since it was going in the shower, where there is no electrical box. Then I painted it with a can of Rustoleum and added some faux candles. Easy and affordable – two of my favourite things when it comes to DIY!

  • Chandelier – found on local used site, stripped the wiring and spray painted black – $5
  • Battery Operated Faux Candles – Michael’s – $14.99 (with coupon) | another option with a timer

  • Clock – IKEA – about 15 years old, painted the frame black | cute and affordable option
  • Black Curtain Rod – JYSK – $29.99
  • Black Curtain Rings – JYSK – $9.98
  • Sink Skirt – fabric reused from old shower curtain
  • Velcro Strips for attaching to sink – Dollarama – $1
  • Privacy Window Film – Home Depot – $10.97 (we have tons of leftovers)

Materials

  • Pine Wood Planks – (already owned)
  • MDF Trim – (already owned)
  • Baseboards – existing
  • Lattice Trim and Quarter Round for medicine cabinet makeover – (already owned)
  • Miscellaneous – TSP, caulk, painter’s tape, corner trim piece, No Nail’s adhesive – $45.00

Paint

  • Primer – Gripper –  FREE (buy one, get one sale) – $15 (quart) – used on linoleum floor and shower ceramic tile (so far, this is holding up great!!!)
  • Floor Paint – leftover interior paint – (I mixed Behr’s Ultra White and Glidden’s Whiter Shade, eggshell finish)
  • Primer – Zinsser Bull’s Eye 1, 2, 3 – $13.99 – used on wainscoting and medicine cabinet
  • Benjamin Moore Advance – Chantilly Lace, pearl finish (already owned from kitchen reno, but used about a 1/3 gallon) – used on wainscoting, medicine cabinet and shower tile
  • Ceiling Paint – CIL – Chantilly Lace, flat – $19.99 (quart)
  • Door Paint – Dulux Melamine Alkyd – CIL Dark Secret (already owned)
  • Door Knob – original to the house, spray painted in Rustoleum Metallic Gold (already owned)

Total

The total cost of materials and fixtures was $517.95. We were also able to sell some of the original fixtures and accessories on local used sites. This is a great way to bring down the cost of a project! Don’t forget that what is “old and used” to you, might be just what someone else is looking for. People are often looking for secondhand bathroom fixtures for their rental properties or summer cabins. It doesn’t hurt to try! Our total proceeds from sales was over $90! This would have been higher if I hadn’t of accidentally dropped and shattered the toilet tank lid, which made it impossible for me to then sell the toilet! This brought our total renovation cost down to $427.95.

The total cost of accessories was $176.38. Again, for the purposes of this post I only included the cost of the materials and fixtures that would stay with the house if we were to sell. This gives you an idea of how much you could save doing a simple update using a lot of DIY and creativity, verses doing a traditional full bathroom renovation.

pinterest bathroom collage

When I first added up the total cost of this makeover, I was a little disappointed. I had kind of hoped the cost would come in around $300. However, as so often happens in renovations, we went a bit over our original goal. The biggest costs were the new toilet, at $110 and the wallpaper at $120. I am so happy we replaced the toilet, the old off-white one would have stood out like a sore thumb. The wallpaper, even though it cost us a bit more than we had originally calculated because of the installation problems, was totally worth it. I think it makes the bathroom! A can of paint would have been a lot more affordable, but I’m so happy we splurged on the wallpaper. Although, if you read my week two progress, you know that wallpaper can really be a huge expense. Some of my inspiration wallpaper choices from that post would have cost a lot more than the cost of our entire renovation total!

Budget Renovation Tips

If you are hoping to do a similar update to your bathroom, here are some of my biggest money-saving tips.

  • DIY! DIY! DIY! Do as much of the work yourself as you possibly can. Almost anyone can paint. If you don’t know what you’re doing, look for a tutorial online! Be smart though and know when to hire out a job that’s beyond your skill set.
  • Shop around for sales, clearance items, use coupons, go to yard sales, check local used sites for deals, check for curb-side or back alley finds.
  • Shop your house! Use what you already have. You’d be surprised what you might have stashed away in your garage or basement that you can reuse. What you were once tired of, can feel completely new and fresh with a coat of paint!
  • Try to update instead of replace, wherever possible. In this renovation we kept the sink, bathtub, shower tile, medicine cabinet and even the old vinyl flooring. The drywall, baseboards, trim and window are all original. Everything feels fresh and new once we painted it, (even that old shower tile and vinyl flooring!), and the pink sink and tub are now beautiful character pieces, instead of ugly eyesores.
  • When you do need to replace, try to keep plumbing and fixtures in the same position. We saved money by keeping the light fixture in its original location, and simply replacing the dated fixture.  If you are doing a full renovation, a lot of money can be saved by keeping tubs, toilets, sinks and light fixtures where they originally were.
  • Spend your money where it will make the biggest impact. In our bathroom makeover we chose a statement making birch tree wallpaper, but one that was still budget-friendly and only installed it on the upper third of the walls. At $120, it came to nearly 30% of our small budget, but it packs a big punch! I don’t think the makeover would have been the same without it.

Overall, I’m really proud of the transformation we were able to achieve. When you consider that the average bathroom renovation in Canada costs $9,100 – well I am very pleased with our total of $427! We just saved ourselves $8,600! Of course, ours was really an update, rather than a full remodel. I am still confident that this update will last us for many years. The goal was to improve on what we had originally. We did that, and so much more! We are in love with our little bathroom remodel on a budget!

Signature


Some affiliate links are used. This means that when you purchase an item through one of these affiliate links, you receive the same great price and Prairie Girl Home receives a small commission. Thank you for your support!


Save

Save

One Room Challenge Week 6 – A Glam Cottage Bathroom Reveal

TitlePic

We made it. I almost can’t believe it, but we survived. Making over one room in six weeks was chaotic at times, to say the least, but so worth it. I am so excited to share with you today our newly completed cottage glam bathroom makeover!

TitlePic

Just to refresh your memory, or if this is your first visit to Prairie Girl Home, here is what we started with.

bathbeforeedit

My challenge was to update this space, without doing a full demo and renovation. That meant we were keeping the original 1955 pink bathtub and sink! I’ll be completely honest, I wasn’t even sure until a couple of days ago that I was going to be happy with the results. You see, at first I thought this tub and sink were a cute shade of blush pink. Nope. They are dusty rose. Blush pink is like an adorable, trendy and fun twenty-something girl, while dusty rose is the shy and slightly uncool sister. I kept going though, hoping that with all of the black, white and grey shades going into this bathroom, the dusty rose would somehow grow into the mature, subtle and elegant lady that she is. I was right. The ugly duckling grew up into a beautiful swan.

20160512_120436

I’m in love, you guys. Love. I can’t tell you how proud I am of this little space. That sounds like I’m tooting my own horn, but hey, I’ve think I’ve earned a little tooting rights. Wait… that didn’t sound right. Let’s blame it on the fatigue. Over the last week, we poured our blood, sweat and tears into this little bathroom makeover. More work happened in the last week, than the other five combined! I told you, I’m a horrible procrastinator, but that also means I’ve learned to work well under pressure.

Today, I will try to talk less so we can focus on all the pretty pictures! I will come back next week with a complete source list and budget breakdown. I love when people share their budgets, so I’m opening up and sharing! There were also a lot of DIY projects in this little room, so I will be back to share a few tutorials for those as well.

20160512_120054

I’m still amazed at how our medicine cabinet transformation turned out. The power of trim and paint, so simple, yet so powerful!

20160512_115835

I had planned on sewing an adorable sink skirt, with either neat and tidy pleats or ruffles or gathers, but time got the best of me. Instead, I used our old shower curtain and some dollar store velcro adhesive to hobble together this sink skirt. For 15 minutes of work and maybe 2 dollars in materials, it’s a huge improvement over the before!

20160511_180244

I just love our new little faucet. The only items in the bathroom that were actually updated were the faucet, the light fixture and the toilet. I’m so glad we made those choices, because I think all three things go a long way to updating the space.

20160512_120033

The new white toilet is awesome! Who knew I could be so excited about a toilet? We looked for a used white toilet in decent condition, but our search came up short. So we bought the least expensive one we could find and I’m so glad we decided to take the plunge. (Oh my. I didn’t even plan that one. Help me. I need sleep!) Okay, moving on. The white is so clean and fresh, the old beige one would have been such an eye sore next to all our new pretty white trim. I also love that it’s just a regular height, round bowl toilet. Life is about the little things and a white, regular toilet makes this girl happy!

IMG_6042

The light fixture I had planned for the space ended up not fitting in the space.  I had a backup option in mind at Lowe’s, but they were out of stock. The lovely gentleman in charge of the lighting department though, was kind enough to sell me the display model! It was brown, so I gave it quick coat of black spray paint. (Don’t look too closely at my spray job, drips are what happen when you rush spray painting!) We actually had to hang it upside down, or we would not have been able to access the bulb. The look has really grown on me! I love the wire cage. The matte black looks so good against our new grey and white birch tree wallpaper.

Oh, the wallpaper. I have this thing for wallpaper. I love it. However, my poor mom, who so lovingly offered to install it for me and who is an extremely talented DIY woman herself and has applied wallpaper probably dozens of times, had a horrible time with this paper. Unfortunately, it was paper thin and ripped very easily. She persevered though and got the job done. It looks amazing! I think it’s the real showstopper in this little bathroom.

20160511_181913

This might be one of my favourite views. I have a lot of favourites, but those turkish linen towels (which are amazing, by the way), against the bright white wainscoting, with the thick trim and our new sleek black hooks, set against that gorgeous wallpaper with those sharp black frames and DIY art – love, I tell you. Love.

Speaking of DIY art. I had a few ideas for this spot, but I never know what will work until I see it all come together at the end. So one of my last minute DIY projects were putting together this cute little trio. The frames are from the dollar store. The pages are from my “Secret Paris” adult colouring book. I just realized how that may have sounded. Adult, as in, us old people can colour too and not adult, as in, hide from your children’s eyes. (Although, come to think of it, I do hide my book from my kiddo, as well as my good pencil crayons, because a mama has to have some things just for herself!) I just used pink and grey pencil crayons to give the prints just a touch of colour. I love how they turned out!

20160511_181231

Another last minute DIY art project, was this cute little chalkboard frame I whipped up.

20160511_175204

I decided it might be a good idea for me to label the doors in our house. I plan on making matching ones for our bedrooms and our office. You know, just in case we get lost in our 960 square foot mansion.

20160511_180355

Oh, and that cute little toilet paper stand? Eight dollars. I found it used online. It was oil rubbed bronze, but that’s nothing a little spray paint couldn’t fix.

20160511_180746

20160511_181732

This little tray was another last minute addition. I had planned on making one, but I ran out of time. Then I was in the unfinished wood aisle at Michael’s, and saw this little wood sign. A little white paint and it made the perfect little bathtub tray. I have always wanted one of those! Honestly, one of favourite ways to unwind is with a hot bubble bath, a good book and a cup of tea. So in addition to looking pretty, this will actually get a lot of use!

20160511_175005

I searched for a few accessories in dusty rose, to tie in the tub and sink. Do you know how many accessories there are in dusty rose? Not many. I’ll tell you that. Blush pink, like I said, is the trendier, cool sister. But check out that adorable little dusty rose teacup! Gorgeous. So there you go, dusty rose for the win.

20160511_174801

We have to talk about the stump side table. I’m so happy I made time for this little DIY project. My plans for it changed a few times. After a complete disaster with some grey stain, that they should really just call, “extremely ugly shade of grey paint”, I just decided to go back to plan A and paint it white. I couldn’t be happier with how it turned out. That little split in wood at the side? Perfection.

20160511_174748

I’m also a little obsessed with that adorable little milk jug vase. Again, the vase is a Michael’s find that I transformed with a little chalk paint. That adorable little apple blossom I cut from the tiny apple tree we planted last fall in our backyard. Yes, I love it so much, I kept on moving that cute little vase into almost every shot. Can you blame me?

20160512_120137

The little shelf above the door was another project we finished up at the eleventh hour. I’m so glad we did. In a small bathroom, this is a great way to squeeze in a little extra storage. Storage, OR more display space for cute accessories! Either way, it’s great.

20160511_181614

Okay, now that I look at this, I want to move that little antler hook down about an inch and a half. Although, it is very sharp. It wouldn’t be a good thing if it ended up poking my tall hubby in the eye. All right, it can stay where it is.

All of the black and white just makes my heart go pitter patter. I have this thing for black and white. It gets me. Every, single, time.

20160511_181122

Remember the $5 used chandelier I shared with you on week two? Not bad for five bucks, eh? Spray paint can work miracles, my friends, miracles. Those are battery operated candles, by the way. So no need to worry about electrical and water mixing, or flames falling on our head whilst we bathe. That would be sad. Safety first.

A few more details.

IMG_604420160512_11575920160511_18025020160511_18193020160511_17583620160511_181206

20160511_175741

My husband says one of his favourite things about the makeover is that we hung the curtain rod at the ceiling. I agree, it does make the room feel taller. I also think that using a pair of curtains, instead of just one, frames the tub so nicely.

20160511_180704

I don’t think I can pick a favourite thing. Seriously, I’m in love with all of it!

I think what I learned with this renovation, is that if you have something you consider to be an eyesore, like a pink bathtub, but have very little money to change it, that doesn’t mean the room still can’t be beautiful. I knew we could make it better, but really, I had no idea that I would love the transformation this much!

HowtoUpdatea1950'sPinkBathroom

Let’s remind ourselves how far we came with a few before and after shots, because who doesn’t love a good before and after?

before&afterbath

I am so happy we painted that old tile! It was a big job, but wow. That bright white tile looks almost new.

BeforeandAfterCabinet

beforeandafterdoor

PicMonkey Collage

Floor Before and After

Yes, I painted the old linoleum floor! I’ll be back to share a few details on that DIY. If you recall, I did end up ordering some new vinyl, but sadly, it did not arrive in time. I have to say though, if I had not have already ordered it, I may have ended up just keeping this painted floor. Huge improvement, right?

It’s hard to believe we lived with the ugly before for nearly two years! Although, considering the amount of work that went into this makeover, I can believe it. Hours and hours went into this tiny little room. Was it worth it? Most definitely!!!

Now after all of that hard work, I think I’ve earned myself a nice hot bubble bath!

20160511_183319

If you would like to get fully caught up on this transformation, here are the previous One Room Challenge posts.

Week One – Our Cottage Bathroom Makeover

Week Two – Our Cottage Bathroom Design

Week Three – Cottage Bathroom Progress

Week Four – Trim, Paint And Other Progress

Week Five – The Home Stretch

I will update this post with links to any future posts related to this makeover. Stay tuned for the full source list and budget breakdown coming next week!

I want to say a huge thank you to my sweet husband and my loving mom who helped out with this little makeover. I couldn’t have done it without them!

Another huge thanks to Linda, of Calling It Home, for creating and hosting the One Room Challenge! I’m so glad I took the leap and jumped into blogging, starting with this challenge. So far, blogging has been a huge creative outlet for me and I am loving it! If you haven’t had a chance to check out the makeover reveals that the featured designers shared yesterday, you can do so here. All of the other guest participants, like myself, shared their makeover reveals today! Check them out here. You should be able to find loads upon loads of eye candy and inspiration!

Thank you so much for following along! I appreciate it! Feel free to leave a comment below, or catch up with me on Instagram.

UPDATE: Click here to see the source list and the budget breakdown for this makeover!

UPDATE: Here is how the bathroom looks now, with our new vinyl flooring installed!

img_73511

Can you believe it’s vinyl? It really added the final finishing touch!

Signature


Linking with:

Thrifty Decor Chick – Before & After Party


Save

One Room Challenge Week 5 – The Home Stretch

If this is your first visit to Prairie Girl Home – welcome! I am glad you stopped by!

static1.squarespace.comCurrently we are participating in Calling It Home’s 6 week, One Room Challenge and we are giving our outdated 1955  bathroom a cottage glam makeover. If you missed the updates from the previous weeks, you can find them here:

Week 1 – Our Cottage Bathroom Makeover

Week 2 – Our Cottage Bathroom Design

Week 3 – Cottage Bathroom Progress

Week 4 – Trim, Paint and Other Progress

So that brings us to today. Week 5. I’m pretty sure we could also label week 5 as the week mama goes crazy, cries in a corner and says, “I just want this to be over so I can have my house back!” Yup. We are at that point in the renovation. The point where the rest of the house is completely suffering, just because of one little tiny room makeover! At first, it was just one other room that became a mess – my office. After five weeks, the mess has now spilled over into every room. So if anything, I can’t wait to be done this little makeover because it means all of the paint cans and supplies can be put away and our house can go back to normal! Did I mention that we took this bathroom reno on just as we finished up our kitchen reno? So it’s basically been 3 months of chaos. It’s time to end the madness!

So what did we accomplish this week? Quite a bit of patching, caulking, sanding, priming and painting. When I left you last week the wainscoting had received one coat of primer. After that one coat a lot of the imperfections in the wood were showing up. I find that after the first coat of primer, you can really see clearly what needs to be patched. So I ended up spending a lot of time caulking gaps, filling holes, sanding and then repeating those steps when things still weren’t looking right. After all of that, the wood got a second coat of primer.

IMG_5952[1]

The wood really soaks up the primer! Tomorrow, all of the wainscoting will get it’s first coat of paint. I’m sure it will need at least two coats.

The medicine cabinet has been trimmed out and has been fully primed. I’m loving the transformation so far!

Here is what we started with:

medicinecabinetbefore

Here it is today, after we trimmed out the mirrors and added some very basic trim to the top and bottom.

medicinecabinetinprogress

I am always amazed at the power of simple trim and paint. Seriously, the change gets me every time. If you can’t afford to make any other changes in your space, just tidy up and paint! You won’t regret it.

The cabinet still needs a couple of coats of paint. This is just primer. We will also be adding some pretty little knobs. It’s all about the details! Oh, and the mirror is a mess because I never bother taping off mirror or windows when I paint. It takes far less time to just scrape off the paint with a razor once you are finished than it does to tape everything off. There’s my painting tip for the day. Don’t waste your time taping off glass or mirrors – just paint them!

My sweet husband was kind enough to give the ceiling a couple of quick coats of paint. For that we used Dulux brand kitchen and bathroom paint, eggshell finish, colour matched to Benjamin Moore’s Chantilly Lace. The cabinet, wainscoting, trim and shower tile will also all be painted in Benjamin Moore Chantilly Lace, but for those we are using their Advance paint. We had quite a bit leftover from when we painted our kitchen cabinets. Since this is a budget makeover, I am all about using what we have on hand! Benjamin Moore Advance is a water based alkyd paint and is designed for use on furniture or cabinets. The guy at my local paint store thought that it would also hold up pretty well in a bathroom. Let’s hope he is right!

If you are looking for a not too warm, but not too cold, clean, white paint colour, try Benjamin Moore’s Chantilly Lace. Our entire living room, dining and kitchen is done in that colour and we’ve been quite happy with it. It also just so happens to almost perfectly match the white in the wallpaper we chose, so that was a happy accident. Don’t you love those?

OC-65

Prepping the tile was a tedious, time-consuming job. Isn’t it always the prep that just about makes you want to quit? I despise paint prep. The actual painting is never nearly as bad as the prep. I’ll even go so far as to say that I love applying the first coat of paint. Seeing that initial transformation is always the most exciting. Now the second, third or even fourth coats of paint – those I am not nearly as fond of!

I plan on coming back soon to share a more in-depth how to on the painting of this tile, but here it is after a lot of scraping off of old silicone and chipping grout, repairing the spots that were missing grout, scrubbing, caulking around the window trim, more scrubbing and finally – primer.

IMG_5944[1]

I used Dulux brand “Gripper” primer. It is designed to adhere to tile. I am thinking I should probably do one more coat of primer and then I can move on to paint. Let’s hope the Advance paint holds up!

I also got around to sanding the tree stump that will be made into a little stool/side table. I thought the sanding would take forever, but it really shaped up nicely after about 45 minutes or so.

IMG_5947[1]

Originally I had planned on painting it white, but I’m having second thoughts and I might just end up sealing it as is, or staining it just a touch darker before sealing it. I think it will be gorgeous either way. I’m so happy I made for this little project! I think it is going to add so much to the room.

So we obviously still have quite a ways to go if we are going to finish up this week. First up, a lot of painting! My mom has lovingly offered to come and help me wallpaper on Saturday afternoon. This room is tiny, but there are a lot of corners, a window, a door, a light fixture, a cabinet and a shower surround to work around. That is a lot of tiny cuts! Here is the wallpaper, from Bouclair Home.

iphone april 13 338

I ordered the new vinyl flooring, but unfortunately it won’t be here in time for the reveal next week. This is the pattern I decided on, Filagree Iron by Mannington.

IMG_5797

I’m in love with it. Love, I tell you. I’m a little sad it won’t be here in time for the final reveal, but it will be worth the wait. I am hoping to at least get a couple of coats of primer down on our old lino in time for the reveal next week. If I don’t, I’m afraid all of our hard work might be for nothing because the yellowy/beige floor will stick out like a sore thumb next to all of the beautiful bright white!

Here is how our to-do list is shaping up:

  1. Remove old tile surrounding toilet, sink and medicine cabinet. DONE
  2. Prime walls and ceiling. DONE
  3. Add wainscoting to lower half of walls. DONE
  4. Add trim, prime and paint and add hardware to medicine cabinet. STARTED
  5. Paint ceiling. DONE
  6. Prime and paint trim. STARTED
  7. Fill the really big knots in the wood, prime and paint wainscoting. STARTED
  8. Repair chipping grout, prime and paint shower tiles. Silicone around tub. STARTED
  9. Install window privacy film.
  10. Install wallpaper on top half of wall.
  11. Install new light fixture above medicine cabinet.
  12. Add shelf above door for extra storage? (We definitely will be adding this at some point in the future, but I’m not sure if we will have time for it this week. Stay tuned!)
  13. Install new sink faucet.
  14. Change out toilet. (I don’t think this will happen in time for the reveal next week. The new vinyl floor will not be arriving in time for the reveal and it makes no sense to replace the toilet now, only to have to disconnect it when the floor is installed in a couple of weeks.)
  15. Prime, paint and stencil old lino floor OR buy new vinyl floor and install. (New floor ordered, but will not be arriving until May 25th. Will do a quick paint job on old lino.)
  16. Choose fabric, sew and install sink skirt.
  17. Spray paint chandelier, buy battery operated candles, install.
  18. Sand and paint or stain tree stump side table. (I am ridiculously excited to finish this little project! It is going to add such a natural touch to the bathroom.)
  19. Decorate! (Shower curtain, artwork, hooks for towels, toilet paper holder and other small decor items.)

There are still a lot of details that need to be decided on. I’m excited to get the “dirty” part of this makeover done with and move on to the “pretty” part. Decorating! I still have a lot of details to decide on – but that’s the part I enjoy the most. Seeing how everything is coming together, and then adding those finishing touches.

Many thanks again to Linda from Calling It Home, for creating and hosting the One Room Challenge. Don’t forget to check out the featured designers progress, as well as the progress of the other guest participants.

Thank you so much for stopping by. Feel free to leave a comment below (if the comment box isn’t showing up below, just click the “comments” link right beside the date at the top of this post) or you can find me over on Instagram. I hope you’ll come back next week for the final reveal of our cottage glam bathroom makeover!

Signature


One Room Challenge Week 2 – Our Cottage Bathroom Design

iphone april 13 337

Has it really been a week since this challenge started? That means there are only four weeks left to get this little bathroom reno of ours complete!

If this is your first visit to Prairie Girl Home you might want to start by reading last week’s post, where I explained what the One Room Challenge, created by Linda of Calling It Home, is all about. Basically it’s a blogging challenge where we all have six weeks to complete one room in our homes. Technically, it’s only five weeks of actual work, but there are six weeks of posts.

I really hoped to make a dent in at least some of our to-do list that I shared last week. However, this little thing called ”real life” got in the way of all my renovating and decorating plans! Don’t you hate when that happens? So the bathroom looks exactly the same as the pictures I shared last week. Oh, wait, we did take the towel bars down. That’s progress, right? What did happen is I made quite a bit of progress in nailing down the design plan.

Last week I shared a mood board of where I was heading with the design for our pink bathtub, pink sink, time-warp 1955 bathroom. The pink tub and sink are staying – so my challenge is to make that look somewhat intentional and not “we don’t have enough money right now to do a full renovation.”

design board our bathroomThe plan ended up changing a wee bit. I did warn you that might happen! I change my mind constantly when it comes to design decisions!

So some things are on track with how I originally planned them. First off – the chandelier! This was just a “maybe” on my want list, but when I found a steal of a deal on a local used site I had to jump on it! Check it out.

iphone april 13 316

Five bucks!!! How great is that? Maybe you’re thinking, ‘Uh, Kari, I wouldn’t have paid a single penny for that.’ Don’t worry. Once I get rid of the glass and spray it all black, I think it will be perfect when centered above the tub. We don’t have electrical in this spot, so it will just be decorative. I think I can somehow remove all the wiring and then I will rig up a way for it to hold some of those battery operated flameless candles. Which, by the way, are super expensive! At least the ones I found on Amazon are. I will keep searching, because there has to be some out there for less than $60!

Here is my kind hubby holding the chandy in place so I could have an idea if it would be a good fit.

iphone april 13 314Wasn’t that nice of him? He puts up with all of my crazy design ideas. As you can see, he’s a tall fella so we will hang it a bit higher. I’ve decided to move the shower rod up to ceiling height, so it won’t block the view of the pretty chandelier. I think the chandelier will make a great focal point, since it’ll be one of the first things you see when you walk in the door. Here was my very amateur sketch from last week, but you still get the general idea of where I’m headed.

bathroomsketch2.jpeg

In other developments, I realized that my tendency towards hoarding has reached new heights (or maybe depths, you decide). Between my office/craft room, basement and garage, I officially cannot remember what I have stashed and where. This should probably be considered a bad thing, but I’m going to count it as a win where the One Room Challenge is concerned, because after digging around I found quite a few things that will save us quite a bit of moolah! Yippee! I told you last week this reno is all about trying to do a lot, with very little.

I remembered that we still have some 4 inch pine boards leftover from when we planked the ceiling of our main living areas.

IMAG1387

That is awesome, because beadboard panels can actually be quite expensive.

I’m also kind of hoping we can do the ceiling in the bathroom while we’re at it as well. I mean, we already have the boards! I haven’t asked my hubby how he feels about that idea yet… he may not share my enthusiasm.

The thing I spent a lot of time on this week, as far as design planning, was wallpaper. Oh, wallpaper, how I do love thee. Seriously. I loooove looking at wallpaper samples! Here is where I struggled – I love ALL the samples and choosing just ONE was so hard! The thing about wallpaper is that it can be a bit pricey and it’s also a bit of a job to install, so you really want to LOVE the one you pick. I mean truly adore it. So I was on the hunt for a wallpaper in my price range (AKA as low as possible), but one that I loved and felt confident I would love for years to come. No pressure, right? Here are some of the ones I was admiring.


anewall.com floralvia anewall.com

This is the one from my inspiration board, but it was a bit out of my price range – especially once I factored in the US/CAN exchange rate, taxes, shipping and duty. Oh boy. Sometimes online shopping is just not as much fun for us northerners!

wallfloravia wallflorashop.com

This one from wallflorashop is positively gorgeous, but again – way out of my price range.

anthropologie floralvia anthropologie.com

Oh, Anthropologie. You are boho and vintage and classy and chic and modern all at the same time. Beautiful – but not going to happen this time.

farmhouseforfour bathvia farmhouseforfour on Instagram

This bathroom by farmhouseforfour on Instagram (amazing farmhouse – go check them out!) is so inspiring! I love the black and white floral wallpaper. It’s by JF Fabrics, but is ”open to the trade” only. Meaning a designer can order it for you, but little ole’ me cannot.

iphone april 13 289

I posted this pic to Instagram earlier this week. For a brief moment I was considering a pink toile wallaper, thinking that it would help tie in the pink tub and sink. Even though I’m only wallpapering the upper portion of the wall, I decided this would be a little too much pink. At least for me! I also liked the black and grey toile you see here on the left.

iphone april 13 303

This grey and cream floral is really gorgeous, but has a little too much cream for my taste.

iphone april 13 301

I considered both of these. The grey floral was just too much grey. I wanted something with a little more contrast between the white and the grey/charcoal or black. The black and white toile is beautiful, as well as a good price. I did seriously consider it.

iphone april 13 322

Now this pretty white, off-white and grey floral was a real contender. I can’t find the link online, but it’s from the book English Florals, Traditional Wallcoverings. Here it is against my pink tub, along with my charcoal and white striped turkish towels and a grey curtain panel that I totally forgot I had! It makes for a nice combo though. When I saw all of this together it really helped me see that I wanted a much softer grey palette than I had originally thought. I think the grey and the blush pink combo will be very pretty and sophisticated.

My dilemma was that while I liked this wallpaper a lot, I didn’t really love it. I definitely didn’t totally adore it!  Also, because it is only sold in double rolls (majority of wallapers are), I would have to order 4 rolls to do my tiny bathroom, even though I think I only need slightly more than 2. Which was going to be…. $200 plus tax. Yikes! I was kind of hoping the entire bathroom reno could be done for $2-300. So this was out. I was also a little worried about ordering time. The store I was ordering it through said it would take 3 weeks. I was cutting it too close! So I decided to take another look at what I could find in stock. No ordering involved.

Home Depot and Lowes didn’t turn up anything I loved that went with my design plan. So I tried Bouclair Home. I found this.

iphone april 13 338

Cute, right? It had all the colours I was searching for – a clean white, grey and charcoal. I know the birch tree theme is quite popular, but you know how I feel about popular trends? If you love a trend, go for it! If you don’t, then don’t! Just do what you love. That’s all that matters in the end. It’s your house! I think the birch trees will go nicely with the cottage theme I have going, but the sophisticated colours still leave a lot of room for me to “glam it up”! Oh, and did I forget to mention the price? Only $35 per double roll. Remember, the wallpapers above I linked to were priced mostly in single rolls. Which means a double roll is double the price! So this one is really only $17.50 per single roll. I may have to go back for another roll, but if my calculatons are right, it’s going to be close. So the total wallpaper budget may be just this one roll at $35.

I have also been looking at lights to go above the vanity. I found a cute one at Lowe’s.

iphone april 13 327

They were out of stock, but that’s okay because I think I can do better than $65. There is a similar one on amazon for $40, but again, I’m worried about it shipping in time.

I also shopped the outdoor lights at Lowe’s. No, not for our home exterior, for the bathroom. When the kind little teen boy there asked if he could help me and I said I was just looking for a light for our bathroom, he kind of giggled and kindly told me the vanity lights were in another aisle. I’m sure he thought this poor lady has no clue what she is doing! But seriously, outdoor lights can go anywhere! Sarah Richardson says so, and she is my decorating diva, so it must be so!

Look what I came home with.

iphone april 13 337

The exterior lantern light you see here on the right is so cute! It looks way better up close than it did in the box. I think it was $45. The simple one light candle sconce is also very adorable, and was $26. I like them both, but I think I’ll keep an eye out for anything used that might pop up. Spray painting light fixtures is so simple and a great way to update an old gem that someone else might just pass over as being too outdated.

The charcoal “silk” curtains you see on the far left are another hoarding item I forgot I had. They are long enough to hang from floor to ceiling, so I think they will make a great shower curtain, to frame the tub and the pretty chandelier.

The small white and grey towel is actually a tea towel from Walmart. I think they could work as a cute hand towel!

That adorable little hanging wire magazine basket is yet another hoarding find. I bought it at Target a couple of years ago. Back when we still had a Target. (Insert sad face emoji here). May you RIP Target Canada. I miss you and I loved you, even if your shelves were often empty.

The other decor items are things I just grabbed from around the house. Overall, I really love the direction this is heading! Now we really have to get cracking on the actual work! Wallpaper shopping was a blast, but we’re going to have to start getting our hands a little dirty. Hopefully we will have a decent amount of progress to show you next week! Thanks for stopping by, and be sure to check out the featured designers of the One Room Challenge here, as well as all the guest participants here. You can also follow me on Instagram – @prairiegirlhome if you would like to see more updates on how this little reno is going! I’ll be back next Thursday with more room progress!

Kari